The Checkcord, Part 1
Training Dogs with Rick Smith (July/August 2015)
By Rick Smith & Sharon Potter
In every dog’s training, there comes a time to ask the dog to work out away from us at a distance. This is best accomplished gradually and in small steps using a valuable tool: a checkcord. Using a checkcord gives us control over our dog’s movement at an increasing distance, reinforcing how and where we want the dog to work when hunting in front of us.
So exactly what makes a piece of rope into a checkcord? The most important component is the rope. Ideally, a tightly woven nylon is used, and it will have some stiffness or “body” to it. Not all commercially available checkcords have enough body. Even with a good quality rope, more stiffness is helpful, and that can be achieved by soaking it in a bucket of water and letting it sun dry. This makes it easier to handle, since it won’t tangle as much as soft rope, and the stiffness makes control of the rope work smoothly, especially at a distance. This is what the leather collar and snap end of the checkcord looks like. Note the bowline knot, as this is important in helping the rope to work correctly.
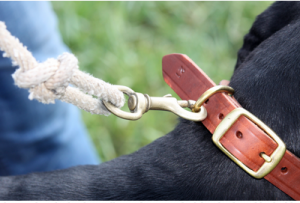
This is what the leather collar and snap end of the checkcord looks like. Note the bowline knot, as this is important in helping the rope work correctly.
The diameter can be 3/8″ or 7/16″ depending on what feels good in your hand. Length is a matter of personal preference, but should fall somewhere between 20-25 feet. Use whatever length you’re most comfortable with. The end that attaches to the collar will have a brass swivel snap tied in with a bowline knot. The swivel in the snap keeps the rope from twisting up, and the bowline knot puts a little weight in the rope, slightly away from the dog’s collar, making the rope easier to maneuver when changing directions. The tail of the rope should be finished with a simple overhand knot to keep the rope from sliding through your hand.
The checkcord will snap to your dog’s collar, which should be positioned snugly at the top of the neck. The ideal collar for this is made of plain, heavy leather, and with a “D” ring to attach the checkcord. This will enable the collar to move easily across the dog’s neck as you cue for changes of direction with the checkcord. The collars with a round ring connecting the two pieces of leather make this action more difficult, changing the way the collar moves against the neck when a tug from the checkcord is applied.
Now that we’ve established what a checkcord is, let’s take a look at what we can do with it. It has the same basic functions as the Command Lead, meaning it tells the dog to come to us or go with us. The cue on the neck, coming from either the Command Lead or the checkcord, should always be a light tug and release motion, rather than a steady pull or hard jerk. The slack is the most important part. There will almost always be light slack in the rope; the only time there is tension in the rope is when you are giving a cue, and then it’s tug, release and you throw the slack back to the dog. If you find yourself waterskiing behind your dog, it means you’re letting the dog take up all the slack.
In order to do this and do it well, you’ll need some rope handling skills in place before you start on your dog. This will help avoid confusion and frustration, since learning to handle a rope of this length takes some practice if you’ve never used one before. The first rule is this: Don’t try to keep the excess rope coiled up in your hand. Allow the excess to just drag out behind you in a straight line. Trying to coil the rope only makes it harder to adjust the length as your dog is moving. If the checkcord is trailing out in a line, it is a simple matter to shorten or lengthen the rope by pulling it through your rope hand using your spare hand. Of course, wearing good leather gloves is always recommended.
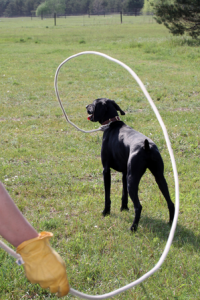
Flipping a loop of rope over the dog to turn right.
When our dog is out in front of us working, the checkcord should have very light tension in it. This does not mean the dog should be allowed to pull or drag you, but it does mean we expect the dog to work at the limit of whatever distance we choose to allow. The rope between you and your dog will not be dragging on the ground, nor will it be stretched tight. So how should the rope feel and what should the correct amount of contact be? Here’s a simple training exercise you can do to learn this and basic rope handling before trying it on your dog.
Drive a stake in the ground, leaving about two feet sticking straight up. Buckle a leather collar in a loop the size of a dog’s neck, then snap the checkcord into the D-ring. Loop the collar over the post, and position it so it is about 18 inches off the ground. Take your checkcord in hand, and move away from the post. Your goal is to apply enough tension to keep the collar suspended in its place on the post, without pulling hard or allowing too much slack. If the collar stays in position without changing shape or elongating you are applying the correct amount of tension. If it slides to the base of the post you’ll need to apply more tension.
The next skill you’ll want to practice before using the checkcord on your dog is learning to flip the slack in the rope over your dog’s back. This will happen each time you change direction and ask your dog to turn and go with you, so it is important to be able to handle the rope in an efficient manner. If you’re fumbling with the checkcord, your dog will not have the best opportunity to succeed, so take the time to practice until you are comfortable with the rope. The following exercise will help familiarize you with working the slack in the rope so it will flip neatly across your dog’s back at each change of direction.
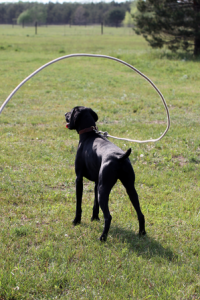
Flipping a loop of rope over to turn left.
In order to turn your dog using the checkcord, there are two options: you can pull and drag the dog (not the option we would choose); or you can lightly toss the rope over your dog’s back and tug the collar using an easy bumping movement with the rope. To learn this skill, you will need to fasten the snap on the checkcord to a stationary object. There are numerous ways you can do this, including buckling a collar tightly around a fence post and attaching the checkcord, or snapping the checkcord onto the tow chain loop on a trailer hitch. As long as the snap end of the checkcord is fastened to something that will keep it at a consistent position, almost any solid object can be used.
Once the snap is secured, take up the rope and step out to the end of it. Start with the rope taut, then take a step forward and give just enough slack so the rope loops slightly toward the ground. Using a sideways movement of your hand and wrist, flip a loop of rope toward the snap end. This won’t work unless there is a small degree of slack in the rope, and the rope should move sideways, not up and down. Your wrist will flick at approximately a 45-degree angle to the right and then left, or left to right, depending on the direction you want to flip the slack. When practicing this, pick a spot to aim at, and see if you can flip the slack to hit the target. This sideways movement of the rope will help turn the dog by sending the rope up, over, and across its back, while up and down is likely to hit the dog and cause confusion. Being able to send the slack to the exact spot you need it in order to turn the dog is an acquired skill, and one that is invaluable in checkcord work, along with good timing. Practice this at several different distances and while moving from side to side as well as toward the snap, and learn to flip the rope while you’re adjusting your distance and position. The bowline knot securing the snap is a big help since it gives just the right weight and swing to the collar end of the checkcord.
Also practice moving closer and farther from the end of the checkcord, sliding the excess rope through your hand and leaving the free end on the ground. Learn to “walk” up the rope when it is snug using a hand – over – hand movement, and do this until you can work up the length of the rope without it moving at all. The more time you spend practicing with the checkcord before using it on your dog, the better success you will have because your instructions will be clear.
Once you’ve got a good checkcord and have developed some solid rope handling skills, it’s time to add your dog – and then birds – to the equation. We’ll get to that in our next column.
