Planting Birds
POINTING DOG POINTERS
By Bob and Jody Iler
Last month we talked about the different kinds of birds we use for training our pointing dogs. Now we’re going to take a look at how we plant those birds! Learning to plant birds properly is crucial and can make or break your pup’s development if not done right. That being said, novice pointing dog owners can learn to plant birds well if you keep some key things in mind.
First, birds should always be planted in the way that most resembles the bird living in its wild habitat. So, for example, you won’t want to plant a bird out on your lawn, covered up by some tree branches! You’ll want to use a field or lightly wooded area where there is cover, but not so much or so tall that it would be difficult for a young dog to find a bird in. Second, you’ll consider what kind(s) of birds you want to plant for your pup and at what stage in his development program, as we covered last month. And finally, you’ll take a look at the methods of bird planting described in this column, and practice to acquire the skills needed to use one or more of these that work best for you and your dog.
For all of these methods of planting birds, we will assume that you’ve properly introduced your pup to birds and he’s now excited and eager to get out in the field and search for them. All methods described will work for all the different types of birds, but initially we’ll use quail and pigeons, and as our pup progresses, we work with chukars and pheasants. Remember, too, that quail and pigeons will recall or home back to their pens, whereas chukars and pheasants generally won’t, and can’t be easily caught to use again in training.
You’ll find it helpful to have an assistant to work with you in the field. You’ll want to keep your dog on a checkcord as you work him into the planted bird(s) and once he begins to scent the bird, he will likely point. As you gently restrain the pup on the checkcord, your helper will flush the bird. It will also help to “mark” the spot where you’ve planted your bird for more effective training. Whether you use “flags” or simply put a piece of masking tape on a sturdy stem of cover near the bird, it helps to know which way to go to work your pup into the bird.
Remember that even though we encourage chasing the bird at the flush to really pump up our pups and get them bird crazy, once we start working them on planted birds, it’s important that we don’t allow the pup to catch a bird. Too many “caught” birds will not bring out a pup’s point, or may ruin the point of a young dog that is pointing staunchly. We don’t want to develop a flushing dog by mistake!
Dizzying
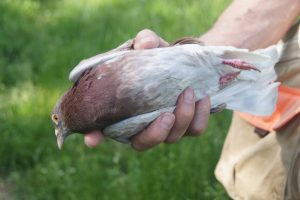
Using either a quail or pigeon, grasp the bird gently around its body. Rotate your wrist back and forth as you “dizzy” the bird; you’ll notice the bird start to relax and its head and neck will “loosen.” Toss the bird with authority into the cover, as if you were tossing a ball briskly downward into the grass. You’ll want the cover to be about a foot high; less than this and the bird will reorient quickly and fly too soon, and higher than this will make it difficult for the bird to easily flush and fly.
Leave quickly right after you toss the bird and return with your pup on the checkcord. Approach into the wind to make it easier for pup to scent the bird. If you’ve done this right, the bird should be on its feet now and will flush as you approach with the pup. It’s fine to let the checkcord go and let your pup chase, as long as you’re fairly certain the bird is up and away. Pigeons should easily elude a pup, but watch out for poor flying quail that come down quickly. If this is the case, keep your pup on the checkcord at the flush and don’t let go. You don’t want pup catching the quail, so simply heel him away from the area.
Head Tuck
If you’re using the above method and the bird seems to be flushing too soon, you can use the head tuck variation of the dizzying method. As you hold the quail or pigeon in one hand, take your other hand and gently tuck the bird’s head to the side and downward under its wing. Stretch the wing a bit over the head. Then, holding the bird with its head tucked under the wing, repeat the process of dizzying the bird as described above. Now, instead of tossing the bird into the cover, reach down and firmly set the bird in the cover close to the ground. Again, leave quickly and return with your dog on the checkcord. It may take a little practice to get this method right. You don’t want to be overly enthusiastic with your dizzying, or “bury” the bird too deeply in the grass, so it remains “asleep” for too long. Also, quail can be fragile, so be gentle and consistent with your head tuck and dizzying, but handle them lightly.
Spin and Release
We use this method often with quail as it works well to disorient the bird without handling the quail excessively. We had our local feed store cut and sew us some burlap sacks that are about the width of a wine bottle and at least twice as long and open at one end. We take a couple quail into the field in our game bag.
At our first planting location, we drop the quail into the bag, twist the open end shut, and then spin the bag by the (closed) open end in loops, without stopping, as we count to 30. We’ve found that about 30 successive spins will disorient the quail well. Immediately after we stop the spin, we’ll grasp the sewn shut end of the bag and gently shake the quail out quickly and firmly into the cover. We’ll hustle on to the next location and repeat the process with the second bird. By the time we return to the field with our pup, those quail are “awake” and poised to fly.
EZ Traps
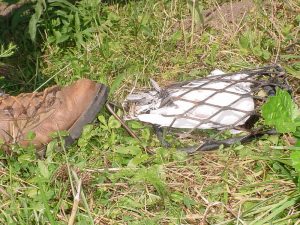
In the January-February 2005 issue of PDJ, we published “The EZ Trap: Bird Planting Made Easy.” In it we describe the traps that we use for young pups and later, with finished dogs. These heavy steel traps will work for any type of bird, depending on the size of the trap, ensuring that the bird will remain where planted. Made of criss-crossed metal for the trap body, they allow breathing for the bird and plenty of air to circulate around the trap. They have a step handle on either one or both sides of the trap, for easy bird release.
In using these traps, it’s crucial that you have a helper to release the bird in the trap while the pup is restrained on the checkcord. Traps work well for initial training sessions, but it’s better to switch later to one of the other methods above to simulate more of a “wild bird” scenario for your dog. Traps can also be scented by dogs as they get more familiar with them and we have found that a pup’s point may be diminished by the scent of the trap as well. Traps also make it easier for pups to catch a bird; at this stage, we don’t want this to happen. Traps can be used without most of these issues on a completely finished dog that points staunchly and is steady at least to wing.
Bird Releasers
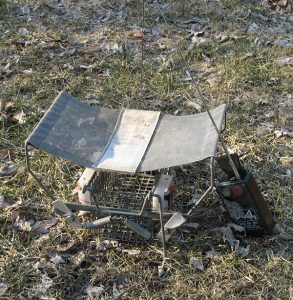
Bird releasers, whether electronic or manual, are another popular method of planting birds. These types of traps can allow you to more easily train your dog on your own without a helper, because as you work your dog into the bird and he scents and points it, you can release the bird from a distance by yourself. The main disadvantage of this type of trap is that it can often scare very young pups who are not yet as bird crazy as they will become. If you use a releaser, make sure it is fairly noiseless and don’t let your pup be “on top of” (too close to) the trap when you release the bird.
We also release our quail “naturally” by taking some in a recall pen and letting them out in the field. This works well for intermediate dogs that are pointing and handling well. In this scenario, we simulate wild bird conditions and allow our pup to hunt and find them. For the average novice owner, it’s often not practical to release birds in this way, and also difficult to train a young inexperienced dog when the handler doesn’t know where the birds are.
Planting your birds and working your pup on a checkcord as he hunts for them is a proven way to develop your pointing dog pup. You have control of the situation, can allow your pup to chase or restrain him as the situation indicates, and avoid many of the pitfalls associated with “random bird exposure and hoping for the best!” If you practice these methods and follow our guidelines, we have no doubt that you’ll be well on your way to developing a great pointing dog!
Pointing Dog Pointers features monthly training tips by Bob and Jody Iler, who own Green Valley Kennels in Dubuque, Iowa. Bob and Jody have trained pointing dogs for over 35 years and have written many articles for The Pointing Dog Journal.


